Why Bother With a Template?
Does it bug you that every time you open a new file you have to fix the print headers and/or footers? Maybe the number format is all wrong. Maybe every new file you open you want to be macro-enabled. Maybe you want every new file to have the company name, your division and date in the first three rows of column A . Or perhaps you prefer the wing-dings font instead of Calibri.
Wouldn’t be great to have the new blank file all ready set up to go when you open it? Dang right it would….
You can create a template that’ll be loaded with all your favorite formatting and tools to enable you to jump right in. There’ll be no more backfilling of formats, footers/headers, styles etc.. You’ll open a new file and voilà, you’re ready to roll!
A template serves as an example from which to copy. Synonyms might include cookie cutter, model, pattern, blueprint, archetype and prototype.
Typically, in Excel, there are three types of templates:
- Worksheet;
- Workbook; and,
- Custom.
The worksheet and workbook templates are sometimes referred to as “Default Templates” because they are used when opening Excel or used when a new workbook is created (File\Open\New or Ctrl+n) or a new worksheet is added to a workbook (Home\Insert\Insert Sheets or Shift+F11 or the “+” button at the far right-hand side of the worksheet tabs).
The custom template is usually a file that is used quite often such as an Invoice, an Expense Report, a Journal Entry Upload, a monthly Sales Report, a Quarterly Forecast or an Annual Budget. Typically, the custom template requires only new data be input. The formulae and formatting wouldn’t change, and the workbook is ready as soon as the new data is installed.
An important aspect of working with templates is that when you open a new workbook/worksheet based on a template, any changes you make will NOT be to the template but newly created workbook/worksheet created from that template. To change the template, you’ll have to perform the same steps as if you were creating the template, except that you’ll use the actual template file.
Creating a Default Template
The first thing you’ll need to do is to locate where your default templates are stored.
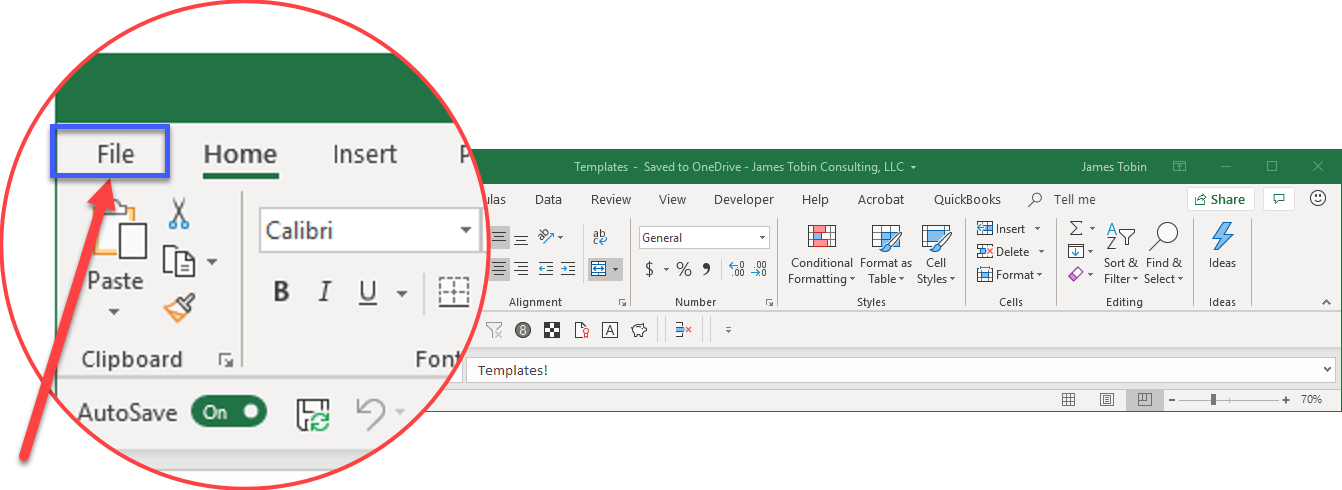
1. From the ribbon, select File then select Options and a dialogue box will appear.

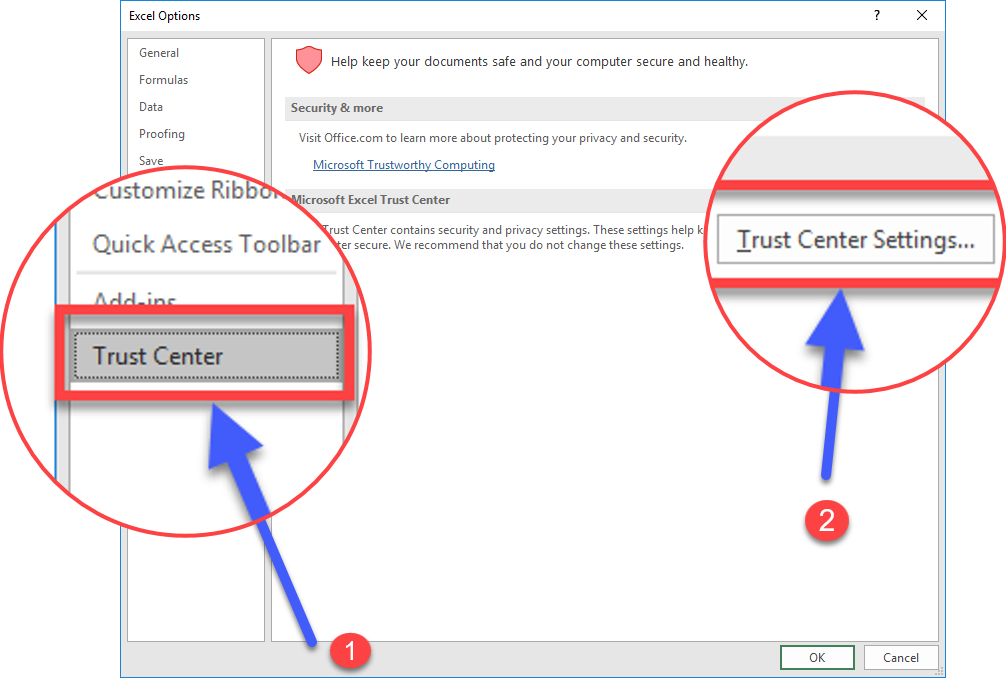
2. From the Excel Options dialogue box, select Trust Center then select “Trust Center Settings…”.
3. From the Trust Center dialogue box, select “Trusted Locations” and then write down the path that corresponds to the “User StartUp” description. Typically, that path appears as:
C:\Users\<username>\AppData\Roaming\Microsoft\Excel\XLSTART

4. Select Cancel (twice) so that you’ll return to Excel info and then return to the open workbook.
5. First, create the workbook template, then create the worksheet template. For the best results, open a new workbook and remove all the worksheets except Sheet1.
6. In Sheet1, create the headers, footers, formatting, fonts, alignments, number formatting, styles etc.. If you’re creating a workbook template, copy the newly formatted worksheet and add as many copies of the worksheet as you wish to the open workbook to create the workbook template, then continue to the next step. If you’re creating a worksheet template, simply continue to the next step.
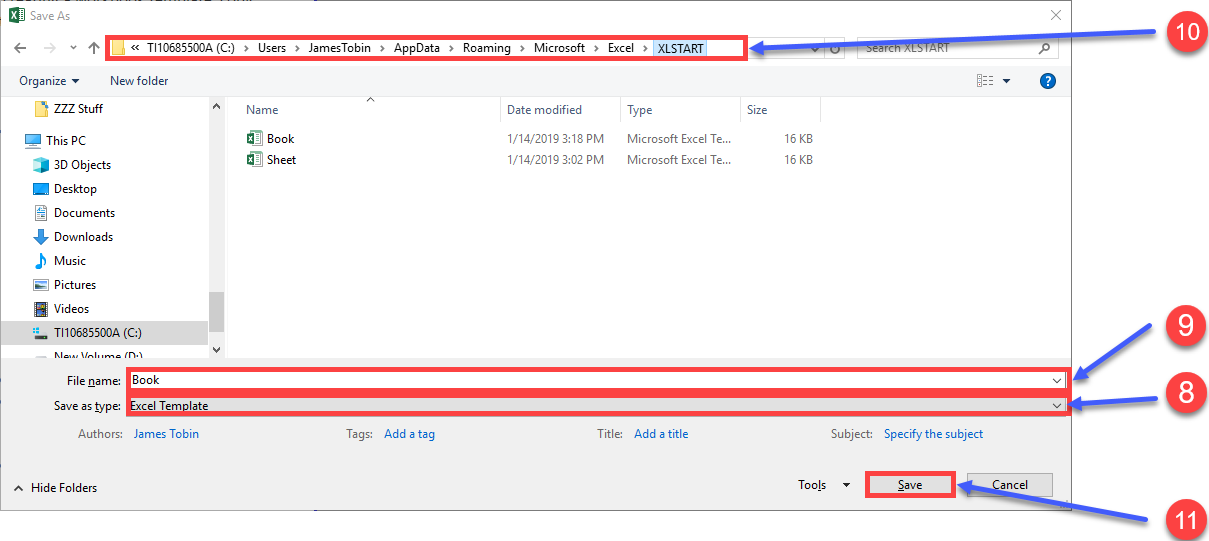
7. Once you’ve created your pièce de résistance, you’ll need to save it as a template in the subdirectory that you copied from step #3. To begin saving the template, press F12 to “Save As…”. The Save As dialogue box appears.
8. *** Save Your Life Tip ***
Start at the “Save as type:” field (found at the bottom section of the Save As dialogue box) and select either Excel Template or Excel Macro-Enabled Template. It is very rare that a default template is macro-enabled, however, custom templates are more frequently macro enabled.
9. *** Save Your Life Tip ***
Next, in the “File name:” field (immediately above the “Save as type:” field), type either “Sheet” or “Book” (sans quotes) depending on the default template you wish to create. Note that there are no numbers following Sheet and Book as the numbers are placed and incremented automatically by Excel as each worksheet is added or workbook is created.
10. *** Save Your Life Tip ***
Next, in the path field (toward the top of the dialogue box), type the path that you found in step #3.
11. When all the elements are correct, press “Save” to save your default template.
Creating a Custom Template
The custom template is usually a file that is used quite often such as an Invoice, an Expense Report, a Journal Entry Upload, a monthly Sales Report, a Quarterly Forecast or an Annual Budget. Typically, the custom template requires only new data be input. The formulae and formatting wouldn’t change, and the workbook is ready as soon as the new data is installed.
The custom template is usually a file that is used repeatedly such as an Invoice, an Expense Report, a Journal Entry Upload, a monthly Sales Report, a Quarterly Forecast or an Annual Budget. Typically, the custom template requires only new data be input. The formulae and formatting wouldn’t change, and the workbook is ready as soon as the new data is installed.
Microsoft has already made hundreds of templates available for Excel users. In many cases, the template may already exist, all you have to do is to open it, make the custom changes you desire and save it again as a custom template (as opposed to a default template) in Excel. For example, you might find an expense report template already created by Microsoft for Excel that will fit in perfectly for your company.
After determining that the template will work perfectly, you need to adjust the template so that the Company Name, Division and perhaps the Approval Path are accurate. Upon opening a new workbook based on the Microsoft template, make the needed changes and then save the workbook as a custom template.
Because this is not a “default” template, it will be stored in a different place. The nice thing about saving custom templates is that when they are saved as templates, Excel automatically changes the path to the correct subdirectory.
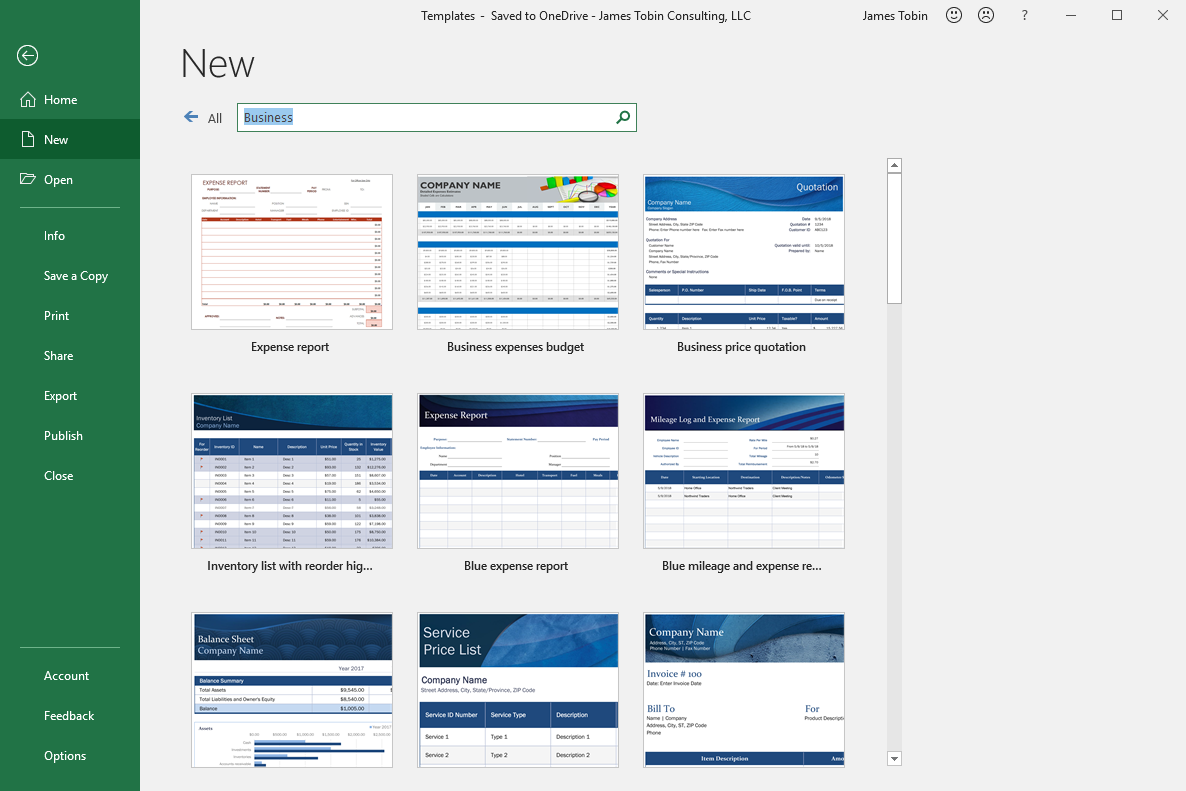
1. To find the hundreds (MS says thousands….) of prepared templates, select File from the ribbon and from the Info page, select “New”.

2. Select the category of template based on the suggested searches provided by Excel. Or, if the template you seek does not fit into the listed categories, you can type it into the “Search for online templates” field to see if someone may have thought of it before.
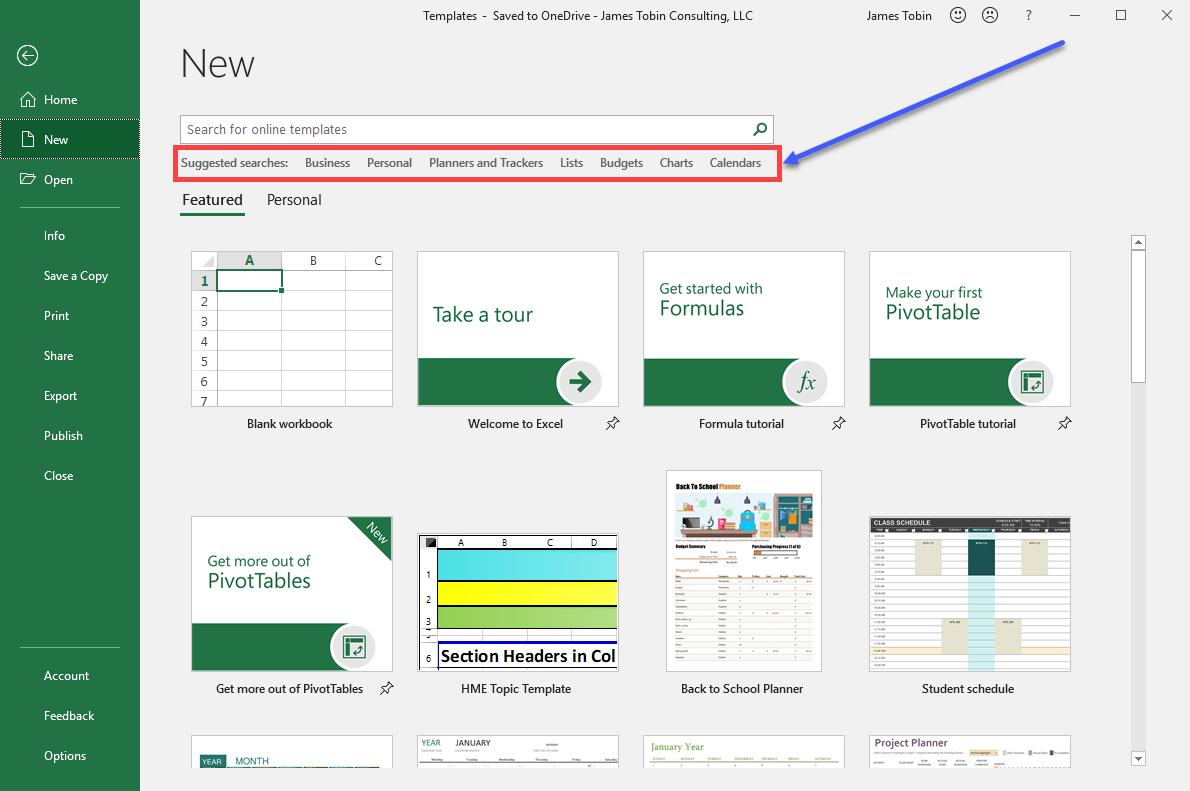
Examples of a few templates listed in the “Business” category.
3. Make the needed changes you’d like to see every time you open the custom template then save it as a template by pressing the F12 button. This will open the “Save As” dialogue box.
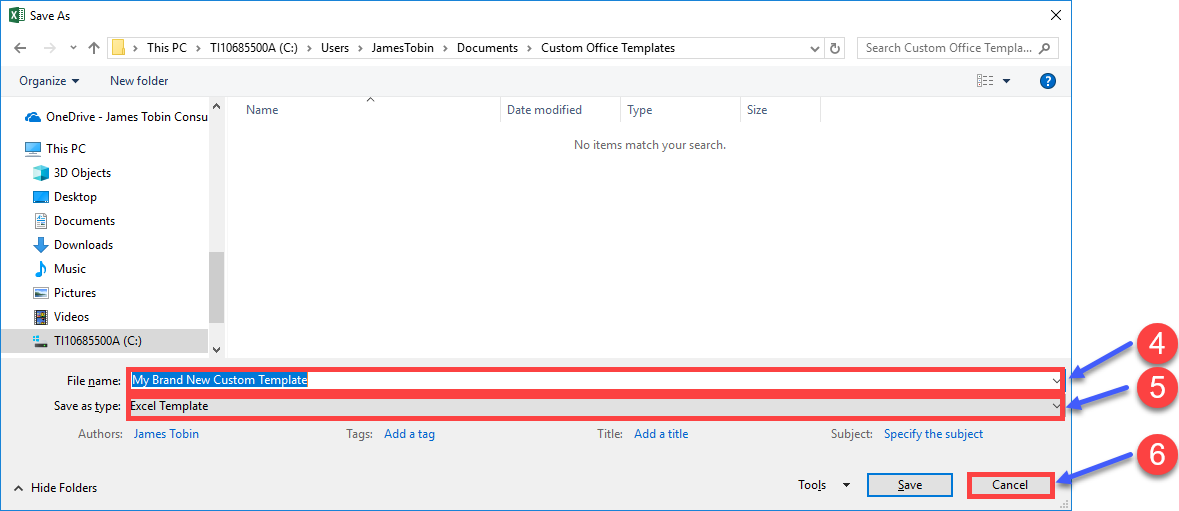
4. Start in the “File name:” field (immediately above the “Save as type:” field) and type the name of your custom template. Excel will place and automatically increment numbers as you newly open your custom workbook.
5. Next, at the “Save as type:” field (found at the bottom section of the Save As dialogue box) select either Excel Template or Excel Macro-Enabled Template.
6. When all the elements are correct, press “Save” to save your custom template.
If after you’ve used your template (default or custom) and want to make changes, simply open the template, make the needed changes and re-save the template as default or custom.
Click here to download these instructions in a PDF file (Templates!!)
Leave a Reply